Tuesday, June 20, 2017

July 4 Number 3D Box Display

Dimensional numeral 4 is built as lid and base, 
then joined (enclosing a pellets or equiv. 
weight packet so it will stand upright). 
Accent shapes decorate the front, 
including divided front panel with "JULY" letters 
on the tall forward arm, and a trio of stars 
on the short back arm. 
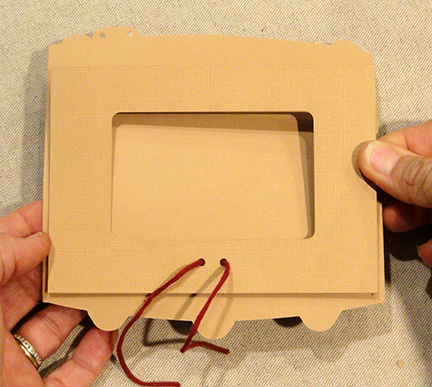
A small punch-hole bracket on the lower panel helps hold 
the optional twine wrapping in place. 
Measures approx. 8.5" tall x 5" wide x 1.25" deep. 

ASSEMBLY: 1. Identify and cut the shapes.
This layout shows the LID front,
overlay accent shapes
(including the "JULY" letters and stars),
the add-on tie tab shape, & the 4 boxing strips
This layout shows the BASE main shape
and the 4 boxing strips.
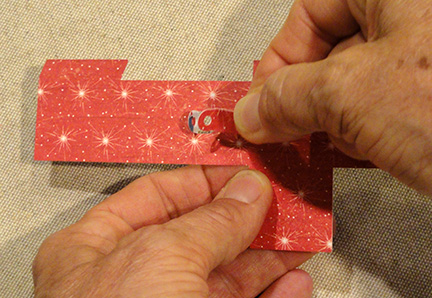
2. Prepare the accent lower shape by
bending the pop-up tie tab with punch hole forward,
also preparing the add-on tab by bending the rounded
"top" portion back in mirror image of the pop-up tab.
3. The two rounded ends with punch hole (to accept
the twine tie at end of assembly) will be placed
together back-to-back, EXCEPT the add-on tab
is first inserted upward from the underside of 
the accent shape, with the extension end being
attached to the underside to fill in the pop-up up
tab's opening.
Position the add-on tab as described, glue
rounded tips together with edges matched,
and glue the add-on extension to the underside
of accent shape.
4. Position and attach the upper and lower
accent shapes to the front panel,
noting that main accents are offset slightly
inside the panel edges.
Also insert and attach the JULY letter
shapes in the cutout openings,
and the stars in their corresponding openings.
5. Prepare the LID boxing strips by bending back
all attachment and rim tabs (long sides of strips)
and bending the cross perforation lines to
match the edge angles of the '4' shape.
One way to do this is to lay out the strips . . . 
. . . according to the symbol cutouts on
strip end or close-to-end so that they
are continuous . Shown here are
the LID (left) and the BASE (right)
showing the angle/corner where the strips
join up.
NOTE that the TOP tab includes a tiny 'T' cut
to identify it at the top tab.
6. Position and attach the LID top tab to the top
of the '4' shape.
7. Bend the next segment of the boxing strip
into position to align the perforation edge at
the edge of the '4' shape, and attach in place.
It may be helpful to invert the assembly onto a flat
surface and apply finger-tip pressure along the tab
and seam to achieve a secure attachment.
8. Bend the final strip segment into position and
attach in place.
9. NOTE the lower strip end that has been
attached includes a tiny triangle symbol cutout.
The matching symbol cutout will identify the
next strip and its end edge that will be attached
in place.
Overlap the straight end of strip 2 over the corresponding
end tab of strip 1 and attach.
10. Bend the strip to align the first segment with
the corresponding straight edge of the '4' shape,
and attach in place as with previous segments.
11. Locate and identify the end tab symbols
the show which strips should be joined
(refer to the illustrations at end of step 5),
then continue to position and attach strip segments
until . . . 
. . . the final long segment of final strip is ready
to position. At the same time as strip is positioned
and attached, also position and attach the final end tab,
aligned with the lead strip straight edge. 
12. Bend back the rim flanges and glue in place
to the backside/inside of the boxing strips.
13. Repeat the assembly process to position
and attach the BASE boxing strips to the reverse
'4' shape, matching symbols in similar fashion
to the LID.
14. Prepare a small plastic bag filled with 
"weighted stuffing material" such as the plastic
pellets used for the model to a size that will fit
into the BASE cavity near the 'leg' bottom as shown,
and insert into position. Secure with glue or tape.
15. Assemble (or close) the '4' box by placing
the LID over the BASE, then invert
and press flat to close.
Secure the LID and BASE box edges together
by easing the LID wall away from the BASE
to apply some quick grab adhesive between.
Then . . . 
. . . apply pressure to adjust the number form
to its actual shape, pressing side walls in
until they join appropriately.
16. Measure and cut the desired baker's twine
in a length that will wrap around the cross bar
of the '4' at least twice (three strands shown)
then thread the lead ends through the pop-up
tab. Wrap the twine around . . . 
. . . the cross bar, then knot the grouped ends
and tie a bow. Trim ends.
Here is the completed July 4 box.

Monday, June 19, 2017

Drum Shaped Card


Highly detailed, built-up layers create a stunning card
for Independence Day or festive Christmas giviing. 
Back layer "hinges" away from front at perforation line 
to reveal message space. Place optional standard gift card 
recess panel with wrap-over tab bracket 
which ribbon-ties closed to secure card in place. 
On front, layer drum main base with inner rim cutout base 
(provides contrast for main body show-thru cutouts), 
main body, front rim strips, banding detail with 
brackets and ball finials, arc flourishes and stars. 
Two-layer drum sticks are added diagonally across 
front and tied in place to card base punched tab 
(as well as foam square attached). 
Measures approx. 6x6 when finished. 

ASSEMBLY: 1. Identify and cut the shapes:
A front card base
B (white) drum front silhouette (shows thru as skin)
C (dk blue) drum back rim/base shape
D (cream) drum hull with 'C' and
star flourishes in place
E hull accent cut-outs contrast liner
F front rim
G strapping shape with ball finials, bracket accents
H drum sticks base   I drum stick front
J card back base
K opt. gift card recess panel build up (3)
L gift card panel strap strip
2. Prepare the drum hull shape by positioning
and attaching the contrast strip behind the shape
so that it is behind the the circle cut-outs ONLY.
3. Layer the "skin" (or head) bottom shape
with the rim shape and the hull assembly shape
with side and bottom edges of each aligned, 
and attach each in place.
Use a flat weight to press the assembly during
the glue drying process if using liquid adhesive.
4. Position and attach the front rim shape over
the top edge of the hull shape.
Position and attach the bottom red trim strip
a scant 1/2" above the bottom edge.
5. Position and attach the strapping shape
over the top of the assembly, matching up
the corresponding ball finial shapes and side edges.
6. Position and attach the ball finial and bracket
accent shapes over the strapping shape.
7. Position and attach the 'C' flourishes surrounding
the square cutouts in each panel.
Position and attach star accent with arms
between the circle cutouts.
8. Position and attach the drum assembly
on the front of the card front base shape,
with edges offset approx. .1".
9. Prepare the optional gift card panel by
layering the three shapes and attaching together,
taking care to line up all cut edges as precisely
as possible.
10. Prepare the strap shape by bending back
the top end tab at perforation line.
Position, centered, over the card window panel,
with tab wrapped around top edge,
and glue tab in place.
NOTE it may be helpful to line up the ribbon
punch holes of strap and panel, then hold in place
as tab is wrapped to back and attached,
since there is a bit of play included in the strap
length to allow for paper thickness variation.
11. Insert a length of ribbon or twine through
both holes (tails toward the front side).
Position the panel (should have strap also in place)
over the back base panel inside face,
center (side to side and top to bottom)
and glue in place.
12. Position front card assembly over back assembly,
lining up edges, and attach the back top panel
(above perforation line) to backside of card FRONT.
13. Insert gift card into recess . . . 
. . . and tie twine to secure in place.
(A piece of double-sided tape behind card will 
additionally help keep it in place.)
14. Layer the drum stick single over the drum sticks
base shape and glue in place.
15. Prepare the attach the drum sticks unit onto
card front by strategically placing (trimmed to size)
foam mounting squares on the backside, then . . .
. . . position drum sticks unit over the card front,
lining up the punch hole near tips,
and angling the sticks attractively across drum.
16. Thread decorative twine through drum stick
hole and drum bases hole, and tie knot and bow.
Here is the completed card.

Sunday, June 18, 2017

America Bunting Swag Plaque

Large scale wall decoration features 
a header with "AMERICA" letters and folk stars, 
layered base shapes that connect 9 three-part 
bunting wedges (base layer add-on layer recommended 
for rigidity),  folk star accents in two sizes, 
and 22 decorative brad accents. 
Layer multiple shapes for reinforcement and rigidity. 
Measures approx. 19" wide x 12.25" tall. 
Pop-out hanging brackets with reinforcements 
integrated for easy ribbon hanging. 

ASSEMBLY: 1. Identify and cut the shapes:
A main header FRONT base (3)
B side FRONT header extensions (2 sets of 3)
C & D header side BACK sections (3 left, 3 right)
E & F plaque fronts with letter guide marks
G hang tab reinforcements (for pop-up tabs in C & D)
H plaque trim strips (4)
I plaque accent stars   J letter accents
K & L bunting wedge upper layers
(include extra hang holes to connect to header)
M regular bunting wedge sets (7)
N wedge star accents (9)
2. For strength and heft, layer the header shapes
and glue together, aligning cut edges and brad
punch holes as precisely as possible.
If using liquid adhesive, be sure to apply flat
weights or something heavy over the whole shape 
to keep the assembly from warping or curling
during the drying process.
Here is the main FRONT header shapes . . . 
. . . the left and right BACK header shapes
(be sure to pop up the hang tabs on the top layer
and keep it from being glued flat) . . . 
. . . and the left & right  FRONT side extender "squares".
Shown here is one weight solution:
cast-off fabric covered weight bar from a broken
pulley-weights machine.
(It is being used on a built-up shape from
a different project.)
3. Prepare the tab reinforcement shapes by
bending forward on the middle perforation line
of each. Position over the corresponding
pop-up shape on the back of each of the side header
build up shapes, matching the rounded
upper edges, punch hole and perforation,
and glue in place.
NOTE that the more attractive card stock face
of these BACK side panels is selected
to be the backside of the plaque.
4. Prepare each half of the plaque (face plate)
by positioning a trim strip at top and bottom
edge of each.
5. Identify the LEFT panel by locating the 'L'
cut at the left end of the lead panel that
eventually will be hidden under the left star accent.
Position the left and right panels side by side
and face down on work surface, butt the center
edges together tightly with top & bottom edge
aligned, and secure temporarily with a piece
of cello or other thin tape.
For reference, here are the plaque face shapes
with the 'L' guide mark and the star- and letter-bottom
guide marks shown.
NOTE that the front edge of the 'R' will
line up with the center joint.
6. Position and attach the star and letter accents
onto the plaque panel assembly.
7. Assemble the header by positioning and attaching
the BACK left and right panels behind the main 
FRONT panel, lining up top edges and
corresponding brad punch holes of each.
8. Position and attach the FRONT extension units
to the sides of the main FRONT panel, lining up
top and outer side edges.
9. Position and attach the AMERICA plaque
over the header assembly, lining up top and
side edges.
10. Prepare the 7 regular swag wedges by layering
and attaching together the sections as shown,
taking care to line up corresponding outer cut
edges and punch holes.
Also prepare the left top and right top wedges
(identify these by their extra top edge
attachment holes).
11. Position and attach an accent star into
the corresponding recess cutout on each wedge.
12. Lay out the left & right upper, 7 regular wedges
over the downward arch
of the header assembly, lining up the corresponding
brad punch holes.
Remove, apply adhesive, then re-position and
attach each wedge in place.
NOTE that there is a slight margin of space
between each wedge,
and that punch holes of left & right upper wedges
line up with corresponding holes on MAIN header.
13. Insert 22 contrast regular size brads
at all punch holes (reinforcement connectors
and accents).
14. Attach ribbon or twine hanger through
the punch hole pop-out tabs on backside.
Here is the completed swag plaque.